Pages

Thursday, December 22, 2011

Indoor snowman building

Shortly after the first snowfall, the kids wanted to go out and build a snowman.  The first few days it was too cold. Once it warmed up, the snow didn't stay around long.  Since the weather wouldn't cooperate with our plans for the Winter theme, we decided to make an snowman indoors.
Our initial idea was to let the kids paint 3 boxes white.

Then we would attach them together and glue on eyes, nose, buttons, etc.  As we were painting the boxes and listening to the children, we decided not to attach them together.  We cut out eyes, nose mouth out of felt and foam.  We attached Velcro to the back of the pieces and to the boxes themselves.  This allowed the children to stack the boxes as they wished and put the features on as they wished.
I should add that we cut a mailing tube in half and made holes in the medium size box to make the arms.  We put gloves, mittens and scarves in the basket to dress the snowman. The hat was actually one a child had brought from home.  We even put Velcro on the back side of the snow man so two children could put facial features on at the same time.  As I was cutting out eyes, noses, mouths,etc the children were picking up scraps and using them for additional features like ears, mustaches and  even whiskers.


As our week progressed we decided it would be a good idea to add more boxes of varying sizes. That way the children could experiment with stacking them and make more snowmen.  I don't know if we will get to that yet this winter or if it will have to wait until another time.

Thursday, November 10, 2011

Sorting activities

This month we are focusing on Authors and Illustrators.  When I read a story to the class I always tell them who wrote the story (the author) and who drew the pictures (illustrator).  This week while reading some of the Mercer Mayer books (Little Critter) I tried to find activities that went with the ideas in the books and teach them more about illustrating the books.  For the book Just a Mess I decided it would be a good idea to explore sorting things.  As we read the book we talked about how much easier it would be for the Critter to find his toys if they were sorted out.
I decided that egg cartons would make great sorting boxes.  My first thoughts were to paint the egg cups different colors, paint a shape in each one, and put numbers in the bottom.  Then I would find objects of different colors and shapes to sort into the boxes.  I debated for quite a while how to best design it.  The night before the activity I still wasn't 100% sure what I wanted to do.  I found a variety of objects in our cupboards and in dollar bins at stores. Suddenly it occurred to me. I was making it too complicated--too teacher directed.  I gathered all the things I could find.  I showed the kids some buttons. We talked about the colors and shapes and sizes. Then we sorted them in various ways.  The children were sent to the table with their sorting box (egg carton) and a bag of items.   After sorting their bag, some of the children traded bags to try something different. 
Sorting buttons
Sorting Hair ties
Marker lids
Sorting rings
Sorting shape buttons

We also sorted small spools of thread, Christmas themed erasers, and hair clips.  The children have already asked to do this activity again.

Saturday, October 29, 2011

Scarecrows at Preschool

The Preschoolers had fun creating scarecrows of themselves.  Each child brought a milk jug and old clothes. Some brought shoes, coats and hats as well.  To make the heads we put orange paint in the milk jug and the children shook them until the paint covered the inside of the jug.  We put in our favorite dancing music and the kids started shaking!!  The children chose foam shapes for the facial features and we helped them hot glue them to their jug. 

They helped stuffed their clothes with plastic grocery bags.  We duct taped the jug to a stick and stuck it inside the clothes.  Then we placed them outside in our front yard.

We added some accessories like phones, flowers, toys, pumpkins, etc. 

The Tea Party-- "S"- Stocking, "G"- Gum balls, and "C"- Cat. 
"G" Gum balls is texting.

"J" Jellyfish doing the Hoochie-Koochie Dance while "A" Angel sits on top of the mountain.

"R" Rabbit is chillin' while "P" Popsicle is just hanging around (upside down)

"D" Deer " and "A" Apple are ready to go for a bike ride.
"G" Guitar is pulling the firetruck. Firefighters "T" Turtle (in the hat)  and "S" Star are ready to fight fires.


"C" Car is sneaking back over the fence after playing in the back yard.

 "J" Jet (in front)  and "J" Jar (behind) are flying around on their spaceship.

"D" Dog (in red) and "G" Goldfish are sitting in the pumpkin patch. 
We tried to pose the scarecrows doing activities the children like to do and add some silliness too. 

Soon we will let the children take their scarecrow home and they can display them in their own yard.  

Monday, October 3, 2011

Gettin' a little dirty

When I opened a little over 8 years and we put in our first load of sand I remember apologizing to parents when their kids were dirty when they got picked up.  I will never forget what one mom said to me, "Oh it's great! At least I know he was busy playing and not sitting in front of a tv all day."  It was a relief to me that she understood the importance of : outdoor play and allowing children to explore their world even if they get dirty.  Many parents since then have expressed their approval.  

This weekend we added a new load of sand .  The kids were busy for hours!  


Dump trucks were filled and used to make roads.  If you look closely there is a small dinosaur laying on the road.  Before the sand was put in a few 'treasures' were scattered around the yard. the kids are so excited when they find one!  The treasures included small plastic dinosaurs and sea creatures, toy jewelry, key rings, large plastic toy money, and other odds and ends that are kid safe. (There are lots more to be found yet!)

Some of the kids enjoyed making sand castles. 

 The sand castle kingdom.

Yes, the kids went home a little (okay,  some kids-  a lot! ) on the dirty side.  It was not because we ignored them all day.  They worked hard and it showed.  They used their imagination, they worked together (actually their were a lot fewer arguments today than on other days), they learned about the properties of sand, they planned and executed those plans, and they enjoyed the experience. 
  Picture texts were sent to parents throughout the day.  As pick up time arrived, more phone cameras came out and their sand masterpieces were saved.  Tomorrow the sand castles will be toppled, the roads will be dozed closed and new creations will take their place.  The memories of today are saved in pictures, but I would guess the children will remember the experience for many years to come. 

Wednesday, September 14, 2011

Sink and Float explorations

I am a little behind in blogging lately.  We had a busy summer and the school year is maintaining about the same pace.  When planning activities for the month I always feel uneasy when our 'Art' time activity is a hands on exploration activity and there isn't really anything to send home.  I KNOW the children are learning from it but as a parent myself it's always nice to see/hear about what they did.  I thought a blog would be perfect for today.  Since the kids are resting I will try to get this up before they begin to awake. 

Our Preschool theme this year is Under the Sea.  In our discussion of fish, we of course have to talk about fishing.  I thought what better way to introduce sinking and floating than with bobbers and weights.  Honestly I wasn't sure how well this would go or how interested the kids would be in it.  I showed them my tackle box. I showed them the bobbers, weights and worms that I had.  (I even included some little fish squirters)

I had two shoe box totes (one for the Toddler class--"The Minnows" and one for the Older pre-k's --"The Jellyfish.")  I put water in each one and let them experiment putting these items in  the water.   
The Toddlers are content just dropping the items in and seeing how big a splash they make and how much water they can splash out onto the table.  The first two boys of the Jellyfish group start off dropping each item in  to see what it does. Then they try dropping the weights on the bobbers to see if they will push them down. They were wondering how the bobbers worked on a fishing pole and as I was showing them that if you push down a hook will appear, "G" Guitar suggested , "Let's hook the weight on it." 

Then we tried it to see what happened and compared it to a bobber without a weight. 
The Minnows weren't so sure about the weight being on the bobber and "T" Turtle asked me take it off.
Everyone enjoyed trying this activity.  Hopefully they will share their discoveries with their families, if not tonight, maybe someday when they go fishing. :)

Tuesday, June 14, 2011

Giving the old a new look.

Summer is here which usually means spending afternoons at the pool.  Lattely though the weather hasn't cooperated with our plans.  Today was quite chilly until mid afternoon. (By that time kids start to get picked up so it was too late to go swimming.)  
In our back yard there are several popular areas to play.  D and G and J can usually be found driving tractors in the sand and making roads and fields.  Various children are swinging and sliding.  The small slides are often bedrooms.  The climbing domes in the front yard are anything from a house to a secret hideout for the Power Rangers or video game characters.

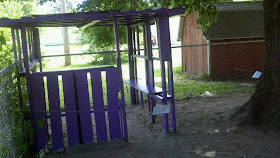
One of the most popular areas is our fort.  Some days it's a restaurant, some days a house. The other day it was "Linda's".   Our fort was originally built back in 2006 by a former employee who was a 'Jill of all trades.'   It's been adjusted and reinforced many times since then.   As I watched them play in there over the past few weeks I've felt it needed a little sprucing up.

Since today was a little too cool for swimming right at 1 o'clock, I decided it would be a fun project for the school kids.  I had some paint let over from the trim on the house.  Of course it was purple! 

We put on long paint shirts in hopes of keeping the paint off of them. (In the end we ended up with some paint in hair and on the faces.) 

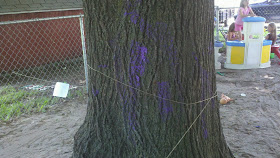
Someone even tried to paint the tree.

Once it was finished we roped it off and put 'Wet Paint' signs up so the younger kids who were napping wouldn't get paint all over themselves. 

The finished fort looks great and should have many hours of imaginative play left in it. 

Thanks kids! AWESOME JOB!! 

Friday, March 4, 2011

There's a Wocket in my Pocket

This is probably one of my favorite Dr. Seuss books.  It's not too long to lose their interest and the rhyming keeps the kids giggling.  After reading the book yesterday we rhymed each of the kids' names. They especially thought the nonsense words were funny.
Our project then was to make Wockets and Pockets.  The original idea for the Wocket came from a school age child who used a small sponge to make a Sponge Bob picture.

We made paper pockets out of construction paper and gave each child a small sponge.  We set out wiggly eyes and sparkly sequins and crayons and let them do their stuff. They turned out quite cute!

Sunday, February 27, 2011

Volcanoes!

No unit on Dinosaurs would be complete without learning about volcanoes.  This is probably the one activity that kids remember the most about Preschool at Linda's.  I've had some 3rd and 4th graders that still ask if they can do volcanoes in the sand outside.
Since snow was covering the ground and we didn't want them sitting in the snow we experimented with the erupting process indoors.
We had small pill bottles that they pretended were little volcanoes.
We added  food coloring to squeeze bottles of vinegar. (We used bottles that come with tie dye kits and ketchup and mustard bottles that are often used on picnics)    We used red, yellow, blue, green and purple food coloring for coloring mixing experience as well as observing the reaction of baking soda and vinegar.

The children spooned baking soda into the bottle and squeezed the vinegar in until it bubbled over.
We brought out a bucket and dumped the tin trays as they filled up so we wouldn't have any major spills.

Sometimes the baking soda built up inside the bottle.

Some of the children would have kept working for hours if we would of had the time and supplies. It's not uncommon for us to go through a jug of vinegar and a couple boxes of baking soda when we experiment with volcanoes.   A couple years ago we made volcanoes out of chicken wire and duct tape.  We had pvc pipe inserts and ping pong balls to fit on top so that when it erupted the ping pong balls flew up in the air.  I don't have any pictures of those right now.  They are in need of revamping so maybe that can be a summer project for us.

Dinosaurs!

During our unit on Dinosaurs the Super Heroes were called into action!  We brought out the box of dinosaurs. We have large, medium and small dinosaurs.    We learned some of their names but we found many are hard to pronounce, even for the teachers.
One day the Super Heroes found this note in the back of the story we read.

We had already learned what 'extinct' meant so the children knew exactly what we needed to do. We bundled up and headed outside to find the dinosaurs trapped in the snow.

One dinosaur was caught while peeking out to see if we were looking.
We rescued all the dinosaurs so they would not become extinct!

Tuesday, January 18, 2011

Black Light Party

Since December is always so busy we skip having a Christmas Program and wait until January to have a Family Night/day.  In the past we've had a Science night or spent a Sunday afternoon sledding.  This year we had a Black Light Party.
We found so many neat ideas when we did Glow in The Dark Week around Halloween that we wanted a chance to do them when it was really dark.
Now, just to clarify there is difference between things glowing in the dark and glowing under Black Light.  The glowing activities we did all were made possible by the use of Black Light.
Our first obstacle was to determine how we could get enough black light in the rooms to get the right effect.  Unfortunately (in terms of this venture) most of our lighting is fluorescent tubes.  Black light tubes for these (4 ft) run around $13 each at Menards.  After experimenting we discovered that we can just use one bulb in most of the fixtures.  (Our plan is to get more bulbs each year).
I lucked out and found clearance Black Light bulbs from Halloween at Menards for $1.50 each.  We put those in all the ceiling fans we have in each room. They weren't very bright but they did help.

Once all the black lights were put in we were pleasantly surprised at how many things 'glowed' that we hadn't planned ahead of time.


We set up three rooms with activities.  Our biggest disappointment was our Cosmic Bowling.  We tried using Glow in the Dark paint on the pins but since they were colored and not white they just didn't glow. (We are already keeping an eye out for a set of white pins).  We had a disco ball to add to the effect but it just wasn't what we'd hoped for.  Kids still had fun bowling.

We had some neon pony bead and set up a table to make a necklace.  The end of the string was hard to see, but thanks to one of the dad's playing around with a high lighter we got the idea to color the end of the string with highlighter so it would glow. This made it easier to see where to put the beads on the string.
It's hard to see in this picture but the glowing orange in the bottom left hand corner are the beads.

The biggest hit was the glowing play dough.


G Man was pretty psyched that his hat glowed too!  

Even the staff got in on the fun!  D is sporting her glowing mustache! 


The kids thought it was so cool that their shirts glowed!!

This is what happens when a dad has too much fun playing with a highlighter.  Sure hope it washed off her face! 
We also tried glowing bubbles but our bubble machine was broke and couldn't find anywhere that sold them this time of year.

So how do you making glowing play dough and glowing bubbles?  Simple---highlighters!  For play dough simply take the ink insert out of a yellow highlighter and let it bleed  into the water you use to make the play dough.  (we made the cooked version).  For glowing bubbles put the ink insert from a highlighter in the bottle of bubble soap you buy in the store. You could also make a homemade bubble solution and add it to that.

To top off the night we had mini cupcakes and Mountain Dew.  Mt. Dew is supposed to glow in dark (which is the ONLY reason we'd serve something with that much sugar)  but we weren't impressed.  

Overall I think the party was a success!!